Quick Disclaimer: I was not the smart person who initially discovered how awesome Google Forms could be for our learners... credit belongs to an Occupational Therapist that works with students in my classroom. I was so excited about this idea that I couldn't help but share with others.
Google forms initially was an idea we discovered could help some of our students who had trouble handwriting, required some added prompts, and may be taking too long to complete the chain of logging into an email account and copying a daily journal.
Since I teach Middle School students, I am always thinking towards the future. Although I believe my students can learn the skills they need, some may never perform the skills at a quick enough speed to use them functionally in their life. I try to find ways to help my students acquire and perform useful skills quicker....so they can be useful in their future. I also am always looking for ways to help students complete these chains INDEPENDENTLY. They work hard...and it pays off!
SO...here is my STEP BY STEP guide to setting up a GOOGLE FORM as a DAILY COMMUNICATION SHEET BETWEEN SCHOOL AND HOME.
Step 1: Log into your Google Account. If you don't have one, it is pretty easy, and FREE, to set up.
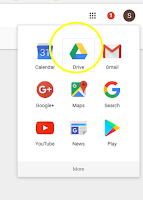
Step 2: Once logged into --> click on the Google Apps "waffle" icon in the top right corner.
Step 3: Access your Google Drive from the drop down menu
Step 4: Click on NEW (button on top of left tool bar)
Step 5: Click on FORMS from the drop down menu (you may need to first hit "more" to see all the options)
Here is where customization comes into play.... before going on consider what you want your student to see in his/her journal. I will show you some examples of what you can do...but use what is appropriate for your student. I suggest starting simpler and building up to more complex questions.
Step 7: Title Question #1
Step 8: Choose the type of response. Choices include: short answer, paragraph, multiple choice, check boxes, drop down, linear scale, multiple choice grid, date, and time.
The example I show in Step 7 is MULTIPLE CHOICE.
Step 9: If you chose multiple choice or check boxes....add your possible responses. Add as many or few as possible. If you want forced choice--- only list one possible answer.
Step 10: Add visuals!
Hover your arrow over the question or the answers. Click the symbol to the right of the question/answer to add a visual to that section. Choose your visual and press SAVE. You should now see your chosen visual. Hooray!
Visuals added to the question title will be larger than the ones added to the answer sections.
TIP: Use the same visuals that your students have on journals prompts they may have be their desk to keep things consistent and clear.
Step 11: Locate the "REQUIRED" button on the bottom right of the question. Slide this button ON to ensure students cannot skip this section.
Step 12: Press the + button on the right column bar to Add a Question
REPEAT STEPS 7-11 for as many question as you need.
Some of my students are only answering ONE question right now, as they learn to navigate the system. They may be copying from a journal we set up by their desk, as they cannot yet recall. Others can answer several questions, and may be recalling responses from memory.
Here are some of the questions I like to add:
Today's Date:
Time:
In school I _______:
(I use the checkbox response type for this question- students can check ALL of the options that are correct for that day. Students either recall independently or copy from a visual journal when responding).
For lunch I ate _______:
(I use the SHORT ANSWER response type for this question- students either recall independently or copy from a visual journal when responding).
Signature:
Step 13: Once you are completed with your questions you can PREVIEW to make sure everything looks the way you want. Hit the PREVIEW button in the top right corner.
Step 14: Send the form to your student
To see the responses follow the next set of directions below:
Step 15: Click on RESPONSES
Step 16: Click on the 3 vertical dots to see the drop down menu
Step 17: Click "SELECT RESPONSE DESTINATION"
Step 18: Click to "CREATE NEW SPREADSHEET"
Step 19: TITLE SPREADSHEET with students name
Step 20: Click "CREATE"
Step 21: To access the spreadsheet that you just created --> Click on RESPONSES and Click on the green button to "view responses in sheets"
All of the questions and answers will show up in this spreadsheet once they are entered each day.
Step 22: SHARE the response sheet with your student's parents. They can add the spreadsheet to their Google Drive and access this whenever they want. It also would be a great tool for students to use at home (and share with you to check each morning).
VOILA!
Once you get this setup, it is SO EASY to manage each day and provides ongoing daily communication between school and home.


No comments:
Post a Comment